How Do You Know Your Roomba Is Charging: Key Indicators Explained
Keeping your Roomba charged and ready is essential for uninterrupted cleaning. Whether you have the latest model or an older version, key indicators help you know your Roomba is charging properly.
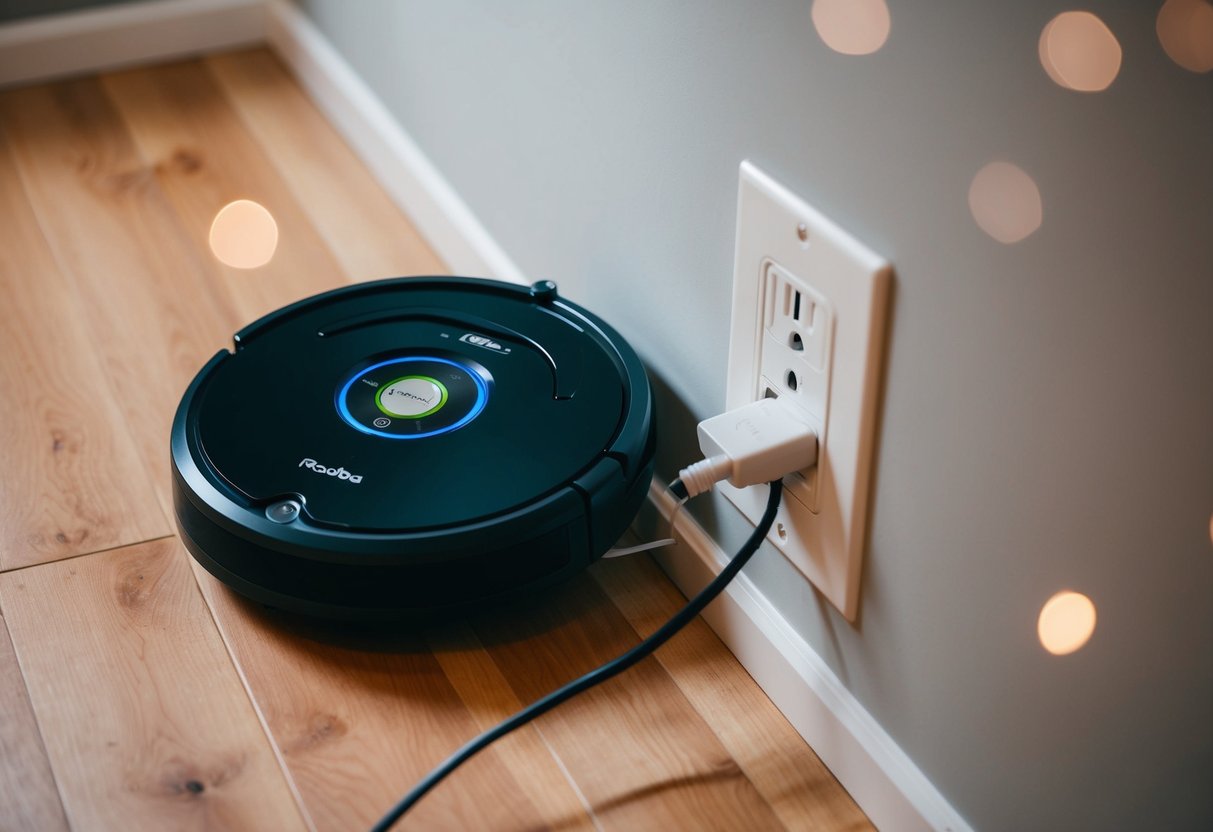
Generally, you'll notice a light on the device or charging dock that signals the charging status. For example, a pulsing amber light often indicates that the Roomba is still charging, while a solid green or white light might mean it's fully charged.
Charging stations play a critical role in the charging process. Ensuring your Roomba is properly docked is crucial for charging to start. Issues such as outdated software or a misaligned charging base can interrupt this process.
Simple checks on these can save time and maintain your Roomba's efficiency.
Staying aware of these indicators and maintaining the charging station can prevent future issues. By following a few guidelines, you ensure your Roomba is always ready to clean when you need it.
Key Takeaways
- Recognize Roomba charging lights and signals.
- Proper docking ensures successful charging.
- Regular maintenance extends charging life.
Understanding the Roomba Charging Process
Knowing whether your Roomba is charging is important to keep it ready for use. You should pay attention to the indicator lights and proper docking to ensure efficient charging.
Basics of Roomba Charging
Roombas have different indicator lights that show their charging status. When charging, many models display a pulsing amber light. This shows the battery is filling up. If you see a green or white light, it means your Roomba is fully charged and ready.
Understanding these lights helps you know when your device is charging right. To check if your Roomba is charging properly, press the "Clean" button. This action displays the current charging state on your Roomba's lights.
How to Properly Dock Your Roomba
Correct docking ensures your Roomba charges fully. Make sure the charging dock is on a flat surface and plugged in.
The docking process is simple: guide your Roomba until it connects with the dock's contacts. You should see a light on the dock or Roomba that confirms proper contact has been made.
Another way to check docking is using the app. It may show the charging icon, confirming the device is correctly placed.
If the Roomba is not charging, inspect the dock and connectors for dirt or obstacles. Keeping these parts clean promotes effective charging every time.
Recognizing Roomba's Charging Indicators
Understanding how to tell if your Roomba is charging involves checking certain features and notifications. This includes the battery indicator lights on the unit itself and alerts from the iRobot Home App on your smartphone.
Interpreting the Battery Indicator Light
Your Roomba's battery indicator light is one of the most clear signals for the charging status. Green or white lights usually mean your Roomba is fully charged and ready to go. An amber pulsing light indicates that it's currently charging.
If you see a red light, it often means the battery is low and needs charging. Press the "Clean" button once and observe the light for the current status.
Models and series may display slightly different colors or patterns, so it's a good idea to check your specific user manual for exact details. Roombas often have a light ring or specific indicator places that provide easy visibility.
Notifications via the iRobot Home App
The iRobot Home App complements your Roomba by providing live updates on your device's charging status. You can see if it's charging, fully charged, or needs maintenance right from your phone.
The app often sends notifications if your Roomba encounters a problem while charging. Make sure to enable push notifications to get timely updates.
Monitoring the app helps you ensure that your Roomba is always ready for its next cleaning cycle. It also offers solutions for any charging issues that might arise, like connectivity problems or incorrect docking.
Maintaining Roomba's Charging Health
To keep your Roomba in top shape, it's crucial to maintain both the charging contacts and the battery. Regular cleaning and proper battery care are key to a long-lasting and efficient Roomba.
Regular Charging Contact Cleaning
Cleaning the charging contacts helps ensure a strong connection between your Roomba and its charging dock. Dust and debris can build up over time, which may interfere with charging.
Use a soft, dry cloth to gently wipe both the contacts on your Roomba and the charging dock. Avoid using water or chemicals that might damage the components.
Clean these contacts every few weeks, especially if your home is dusty.
Inspect the contacts for any visible signs of wear or damage. If you notice any issues, you might need to replace these parts to maintain efficient charging and avoid future problems.
Roomba Battery Care and Replacement
The health of your Roomba battery is essential for consistent performance. Regularly checking the battery's condition ensures that your vacuum operates efficiently.
Charge the battery fully before using the Roomba for the first time. Make it a habit not to let the battery drain completely before recharging, as this can extend its lifespan.
Ideally, keep the Roomba on its dock when not in use to keep the battery topped off.
After about 1-2 years, you might notice a reduced runtime, indicating the battery may need replacing. When purchasing a new battery, ensure it is compatible with your specific Roomba model to avoid charging issues.
Troubleshooting Common Charging Issues
Charging problems can interrupt your Roomba's regular cleaning schedule. Common issues include the Roomba not charging, connection problems with the dock, and issues with the power cord or outlet.
When Your Roomba Won't Charge
If your Roomba won't charge, it might be due to dirty charging contacts. Dust can often build up on these contacts, preventing a proper connection. Use a clean, dry cloth to wipe the contacts on both the Roomba and the docking station.
Another reason could be the battery. Over time, batteries may deplete and need replacing. Check the battery status through the Roomba app or by tapping the 'Clean' button to see the indicator lights.
Resolving Connection Problems with the Dock
Connection issues between your Roomba and its dock are often caused by misalignment. Ensure your Roomba is properly seated on the dock, with both charging contacts touching.
Obstructions can also affect docking connections. Clear any items blocking the Roomba’s way, and place the dock against a wall for stability.
If problems persist, consider resetting your Roomba by pressing the ‘Spot’ and ‘Dock’ buttons simultaneously for about 10 seconds.
Power Cord and Outlet Malfunctions
A faulty power cord or outlet can lead to charging troubles. Inspect the power cord for any visible damage, such as cuts or frayed wires. Replace it if needed.
Check that the outlet is working by plugging in a different device. If the other device does not power on, try another outlet.
Surge protectors or smart plugs might interfere with charging, so connect the dock directly to the outlet if possible.
Technical Support and Warranty Information
If you're facing issues with your Roomba, it’s important to know where to get help. Technical support is a key resource. Visit the iRobot support website where you can find manuals, FAQs, and troubleshooting guides.
For charging issues, check if your Roomba is securely connected to the dock and if the power outlet is working. If problems persist, online support can guide you through identifying problem areas or arranging repairs.
It's advisable to refer to the warranty information when your Roomba doesn’t charge properly. iRobot typically provides a limited warranty that covers defects in manufacturing.
Steps to access support:
- Visit the iRobot Support website.
- Check for troubleshooting guides specific to your model.
- Contact customer service via chat or phone for direct help.
Warranty Details:
- The standard warranty period is usually about one year for robot vacuum cleaners.
- Sometimes, extended warranties are available at purchase.
Using the tools and resources effectively can help you maintain your Roomba efficiently. If you've tried troubleshooting and still encounter charging issues, reaching out for professional help is the next best step. Always keep purchase receipts and relevant documents handy to streamline the warranty process.
Frequently Asked Questions
Understanding how your Roomba charges can help you ensure its efficiency and address any issues that arise. Here, we tackle some common questions related to verifying and troubleshooting Roomba's charging process.
How can I confirm that my Roomba is successfully charging through the app?
You can check the Roomba app for charging status. Once your Roomba is docked, open the app on your device. It should display a charging icon or message, confirming the process has started.
What are the indications that a Roomba j7+ is in the process of charging?
When your Roomba j7+ is charging, look for a pulsing light. This indicates that the device is gaining power. The light sequence may vary with different models, so check your user manual for specific details.
What does it mean when the charging light on my Roomba turns off?
If the charging light turns off, it might be due to energy-saving features on newer models. This is typically not an issue if the Roomba is properly docked. You can verify charging status via the app or by checking the dock's indicator light.
How do I resolve a Roomba charging error such as Error 8?
Charging errors like Error 8 often mean a battery issue. Remove the battery and clean any connectors before replacing it. Restart the device. If the error persists, contacting customer support for further help could be necessary.
What should I expect regarding the duration of a Roomba's charging cycle?
Roombas typically take between two to three hours to fully charge, depending on the model. Ensure it's correctly docked during this time to maintain battery health and avoid interruptions.
Why doesn't my Roomba start cleaning even after being fully charged?
If the Roomba doesn't start, you should ensure it received a full charge. You can do this by checking the app or charge indicator light. If it's fully charged and still non-responsive, try rebooting the device. If that doesn't work, check for other errors that might prevent it from starting.
New posts
How to Fix the "Payment Not Completed" Error on Apple Pay: Simple Solutions
Troubleshooting

How to Keep Programs Running in Sleep Mode on Windows 10: A Step-by-Step Guide
Windows 10

Curl 52 Empty Reply From Server: Causes and Solutions
Web Development

How to Improve WiFi Signal at Home: Expert Tips and Tricks
Home Improvement

The Best Indoor Plants for Air Purification: Transform Your Home's Air Quality
Home Decor

10 Effective Ways to Save Battery on Android Phones
Smartphones

Understanding the Difference Between SSD and HDD: Which Is Right for You?
Tech

How to Back Up Your Computer: A Comprehensive Guide
Computers
How to Clean a Dishwasher Properly: A Comprehensive Guide
Home Improvement

How to Start a Vegetable Garden: A Comprehensive Guide
Home Gardening